Pages

Tuesday, February 11, 2014

Android: How to send email from android application

Create a Linear xml layout as below,

In Android, we can use Intent.ACTION_SEND to call an existing email client to send an email.
Below shows the complete code for sending an email.
package com.example.sampletestapp;

import android.app.Activity;
import android.content.Intent;
import android.os.Bundle;
import android.view.View;
import android.widget.EditText;

public class SendMail extends Activity {

    EditText edtTo, edtSub, edtMsgs;

    @Override
    protected void onCreate(Bundle savedInstanceState) {
        super.onCreate(savedInstanceState);
        setContentView(R.layout.sendemail);
        initializeVars();
    }
    private void initializeVars() {

        edtTo = (EditText) findViewById(R.id.edtTo);
        edtSub = (EditText) findViewById(R.id.edtSubj);
        edtMsgs = (EditText) findViewById(R.id.edtMsg);
    }
     //emailSend() set to onClick() of Send Mail button in xml layout
    public void emailSend(View v) {
        String message = edtMsgs.getText().toString();
        String to=edtTo.getText().toString();
        String subj=edtSub.getText().toString();

        Intent emailIntent=new Intent(android.content.Intent.ACTION_SEND);
        emailIntent.putExtra(android.content.Intent.EXTRA_EMAIL, to);
        emailIntent.putExtra(android.content.Intent.EXTRA_SUBJECT, subj);
        emailIntent.setType("plain/text");
        emailIntent.putExtra(android.content.Intent.EXTRA_TEXT, message);
        startActivity(emailIntent);       
    }
}
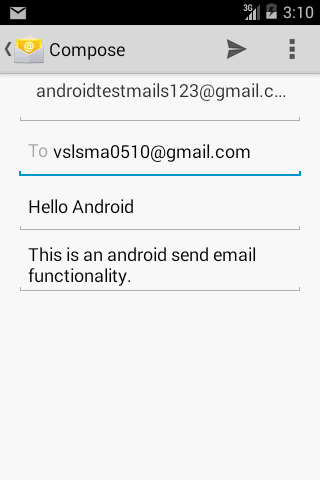
Run the application and fill in all the fields and click Send Mail button.

The screen will be displayed as,

Check the email and message will be received successfully.

Sunday, February 2, 2014

Android: How to add Ads in your Android App

These are few steps showing how you can add admob ads to your android applications.
First create an admob account in http://www.google.com/ads/admob/  or if you already have an admob account, login to your account.
Give all the payment information and then select Sites & Apps tab .Click Add Sites/App, now select Android App

and fill all the informations including App name, Android Package Url and click Continue.

Click on the link "See developer's guide, examples, and FAQ at Google Code" and open it in a new tab.

Click Download Admob Android SDK button, extract the file and copy the sdk jar file,GoogleAdMobAdsSdk-6.4.1.jar to projects lib folder in eclipse.
Right click the Project and select properties. Choose Java Build Path and add the downloaded external sdk jar file.
Now go to the page "see developer's guide", which is already opened in a new tab. Goto "Defining a com.google.ads.AdView" section and copy the code marked in red rectangle box below,

and paste it into your activity.xml file and save it.

Go back to admob website and click "Goto Sites/Apps" button
Here you see you App name listed, click Manage Settings .

A publisher Id will be displayed in next window. Copy the Publisher id and paste it into the
activity.xml file


Next we need to copy some codes to AndroidManifest.xml file. For that again go back to page that we opened in the new tab,"See developer's guide" page.
At the end of the page just above the "The Result" section click on the download example project.

Extract the downloaded file and open the BannerXML folder and open the AndroidManifest.xml file using a text editor and copy the below code to your AndroidManifest file in your project.

Save your project and run as android application. Ads will now show up in your android app.

Saturday, February 1, 2014

Android: A solution for solving the Error, "There is a problem parsing the package"

Parse error while installing your apk file to android device.
Error: There is a problem in parsing package

This error could be caused due to several reasons. I got a solution that rectified the above error.
These are following steps, In eclipse first open your Manifest file, AndroidManifest.xml under res tab.
Change the code below,
                            android:versionCode="1"
                            android:versionName="1.0"
 to
                            android:versionCode="2"
                           android:versionName="2.3.4"
   
Also remove the code,
                            <uses-sdk
                                    android:minSdkVersion="19"
                                    android:targetSdkVersion="19" />
       
and save AndroidManifest.xml file. Create the apk file again with updated Manifest file.
Now successfully Install the apk file again in your phone.

Thursday, January 30, 2014

Android: Install your Android App from PC to Mobile

Here are the followig steps that shows how to install your app from pc to mobile.

First download the Astro File Manager app in your phone. The Astro file manager helps to view your apk file in phone
Then Go to Settings->Application Manager->check the unknown resources option that allows you to install non market applications.
After the above steps, connect your phone to the pc.
Now wait till all the drivers get installed in to your pc.
Open the drive location and copy the apk file.
Then disconnect your phone from pc and go to My Files in your phone and check whether the apk file is copied successfully.
Open astro file manager and search for the copied apk file. Click on the searched file.
The apk file is now opened with astro file manager. Click Install and now you successfully installed your android app from pc to your android phone.

Wednesday, January 29, 2014

Android: Create an Android Application Package(apk) file

An android application package(apk) file is used to distribute and install software in android operating system. These are the following steps for creating an apk file.

 Select the project in Package Explorer. Right click the project and click Export
In the export window, select Export Android Application. Click Next
Select the project to export and click Next.
In Keystore selection choose either Use existing keystore or Create new keystore. Here I choose create new keystore. Choose a location where you want to store the file. Enter password(give any password) and click Next.
In key creation, enter Alias name, passwords, validity years and firstname lastnames which are mandatory fields. Rest of the fields are optional. Click Next.
In destination for apk file choose an appropriate location where you want to store the apk file. Click Finish.
If the apk is created successfully the new keystore status and certificate finger prints will be displayed in console tab in eclipse.

 Finally make sure the apk file is created and saved successfully in the location specified.